User menu
By clicking on the user user menu utente , the basic user informations are available on the top (Fig. 32) while also making available the follow actions:
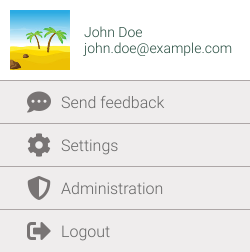
Fig. 32 User menu
Send feedback
Any user has the option of submitting a comment regarding the application using the form provided (Fig. 33).
It’s important to select the right Area of Interest when submitting a comment. These areas are:
: all requests and reports concerning the Dashboard
: all requests and reports concerning the Maps
: all requests and reports concerning Metadata
: all requests and reports concerning the Data analysis
: all requests and reports concerning the Quality control
: all requests and reports concerning the Reports
: all requests and reports concerning the Catasto telefonia mobile
: all requests and reports concerning the Authorizations and permissions
: all requests and reports that do not fall within the other areas
Each request sent will be evaluated by the administrators who will send a reply to the sender.
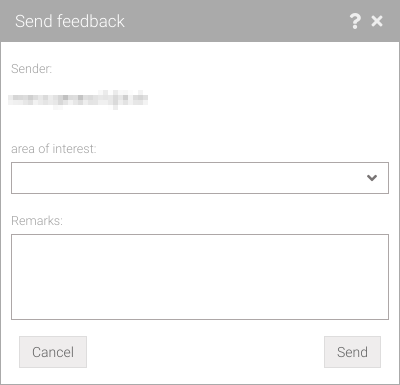
Fig. 33 Submit feedback form
Note
Mandatory or incorrectly filled fields will be marked with red borders. Moving the mouse over the relevant field will give an explanation.
Warning
If you are asking for more permissions, please specify in detail what you want to access and why.
User profile
In the user profile, it’s possible to modify some personal data, the password, and some application settings (Fig. 34). After changing any of these fields, click on the Save button to apply the changes.
It’s also possible to view the authorizations and permissions to which you are eligible (Fig. 35). If necessary, more permissions can be requested using the Send feedback form indicating as the Area of interest.
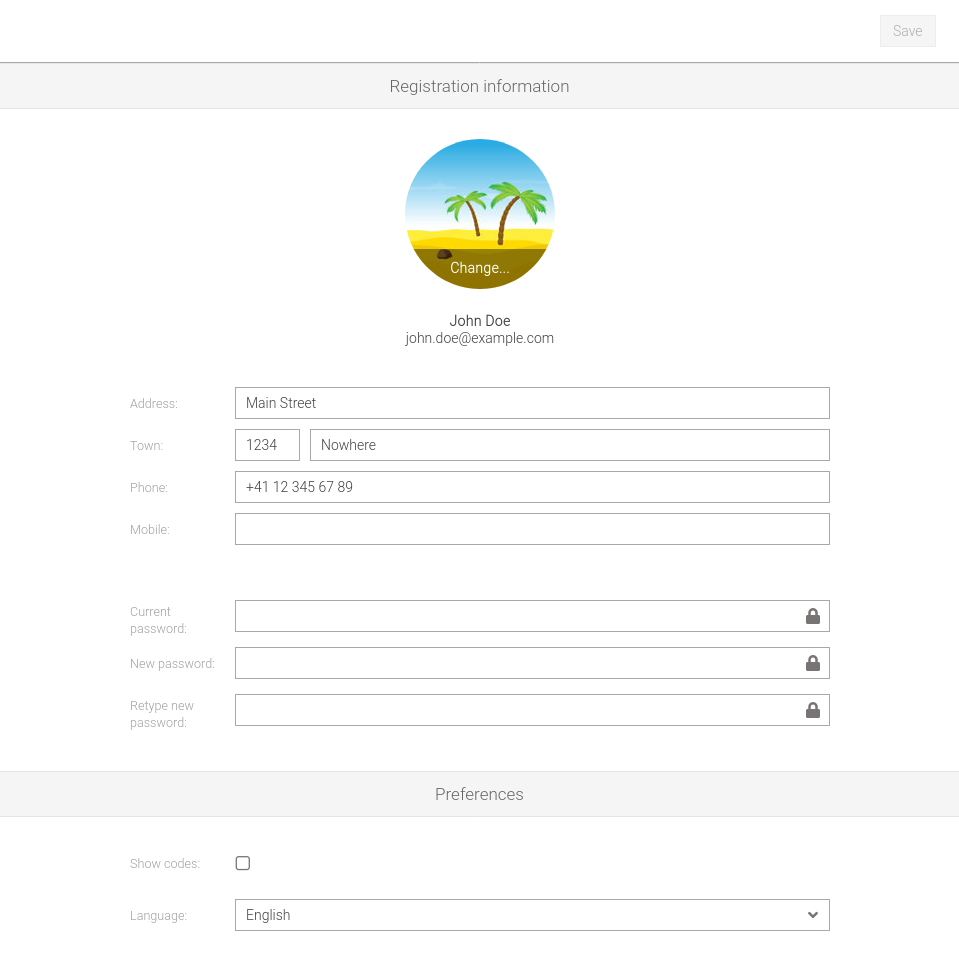
Fig. 34 User profile - part 1
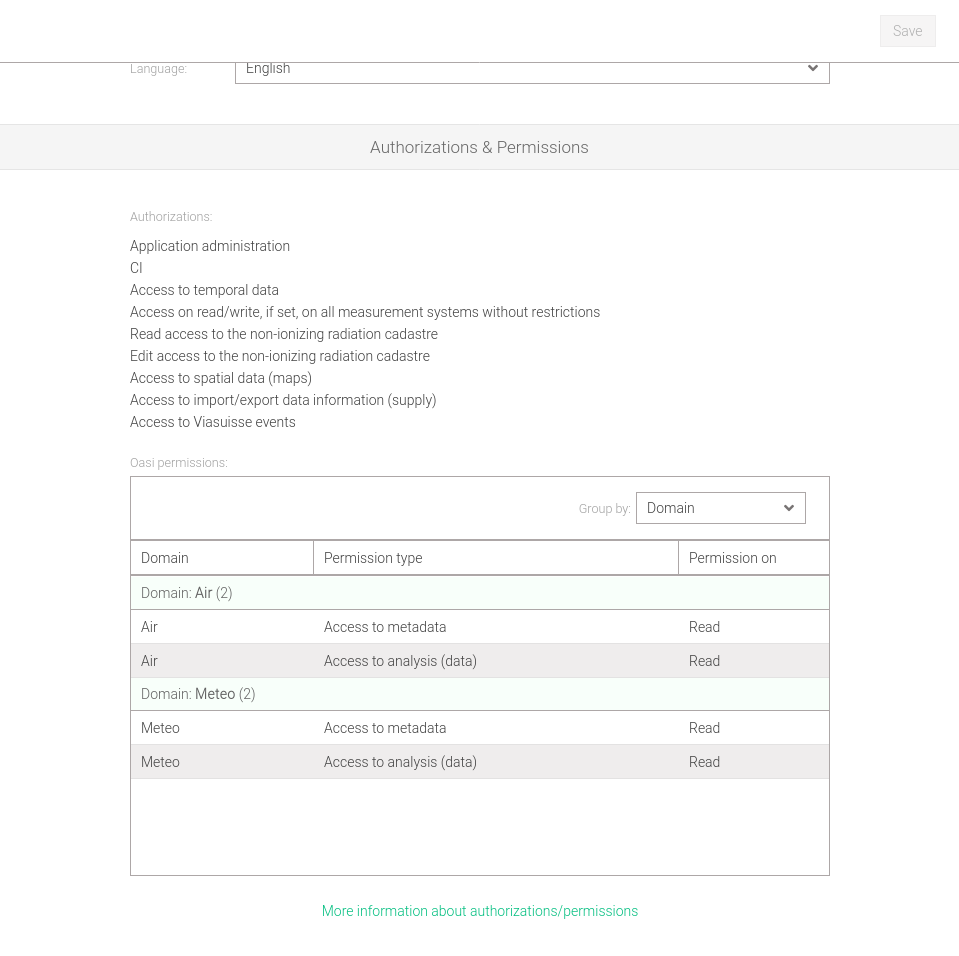
Fig. 35 User profile - part 2
Note
All settings are saved in a centralized database. This means that even if you change browsers, or workstations, the settings will be the ones you set last time.
Warning
To apply the changes, it’s required to reload the page by clicking the button in your browser or by clicking the F5 key.
Change the password
It’s possible to change the password by filling the fields (Fig. 34):
Current password: enter the current password,
New password: enter the new desired password,
Retype new password: Confirm the new password again.
The New Password field uses an algorithm that forces the user to choose a relatively strong password, this is signaled with a colored bar that changes from red (password not acceptable Fig. 36) to yellow (password not strong enough Fig. 37) to green (password accepted Fig. 38).

Fig. 36 Password not acceptable |

Fig. 37 Password not strong enough |

Fig. 38 Password accepted |
Warning
If is in use a Amministrazione Cantonale (AC) account to access Palma there is no option to change the password. In this case, it’s recommended that to change password by going through the official channels of the AC.
Show codes
Click on the Show Codes field (Fig. 34) to enable or disable the visualization of identification codes in pages elements.
Note
The setting is designed more for advanced users and carries no restrictions if not selected.
Change language
By choosing from the drop-down menu Language it’s possible to set the desired language of the application. At the moment the possible languages are Italian and English.
Administration
In the admin panel there is the option to manage:
the organization,
the search indexes,
the maintenance mode,
the changelogs,
Contacts and accounts
From this panel can be have an overview of all contacts/accounts in the application (side list Fig. 39). The users list displays the contact’s first/last name, username, and account type (these if the contact has an account):
: if the account is authenticated through the Amministrazione Cantonale (AC)
: if the account is locally authenticated.
Using the filter it’s possible to filter the list by first name, last name, e-mail, or user name.
Clicking on an item in the list will give the details of a contact.
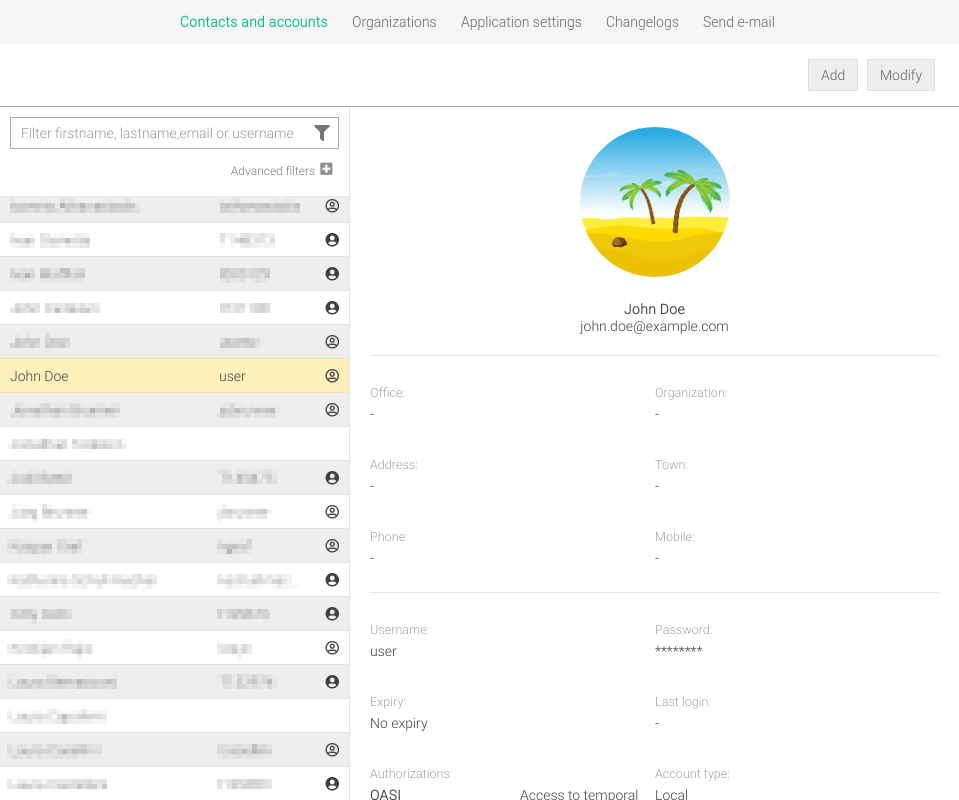
Fig. 39 Contacts administration panel
Advanced filtering is possible by clicking on the Advanced Filters button (Fig. 40), this will allow filtering by:
Authorizations based on one or more authorizations,
Has account based on whether the contact has/doesn’t have an account or if the account is expired/active,
Last login based on the user’s last login,
Account type based on the type of authentication: AC or local.
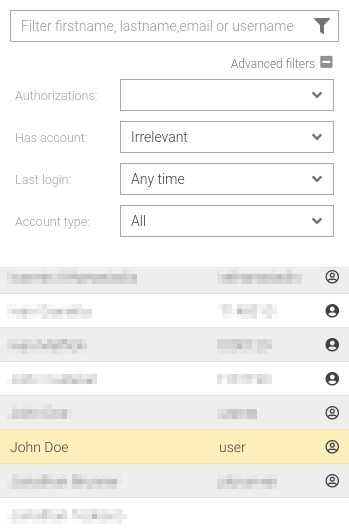
Fig. 40 Advanced contact/account filters
Add
By clicking the Add button a wizard will appear where the first form presents the available fields to describe the contact (Fig. 41). Click on Done button a contact will be created without an account otherwise you can link an account by clicking the Account » button this will present the form to enter the relevant data (Fig. 42).
Contact/account data can also be imported from the Canton Administration’s (AC) LDAP server by clicking the Import from LDAP button. This will open a window (Fig. 43) where, after entering a valid LDAP Username and Password, you can search for a contact by E-mail. Clicking the Done button will automatically populate the contact (Fig. 41) and account (Fig. 42) forms if the user is found.
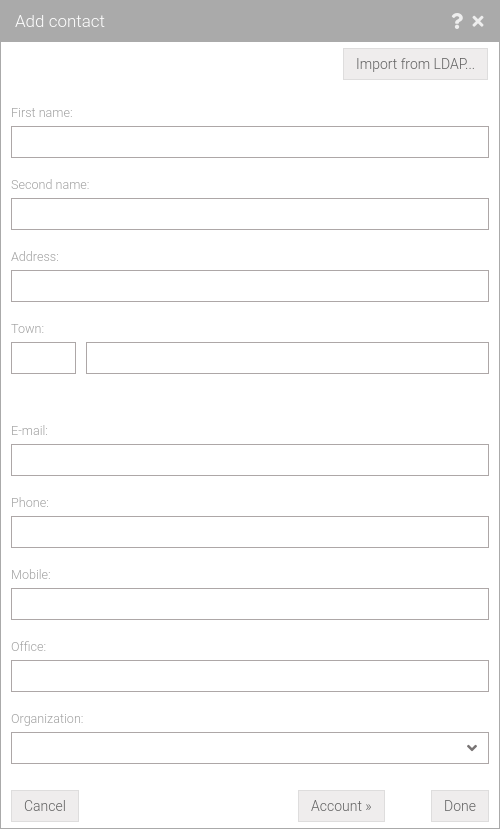
Fig. 41 Add/Modify contact form |
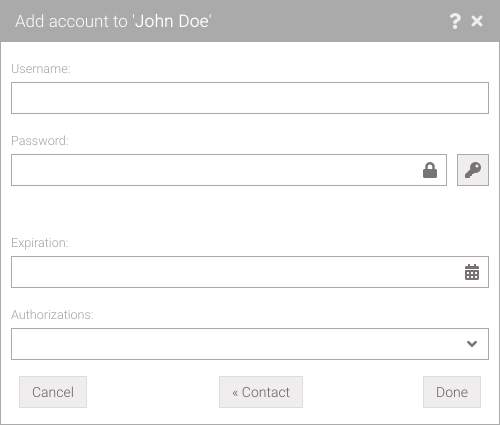
Fig. 42 Add/Modify account form |
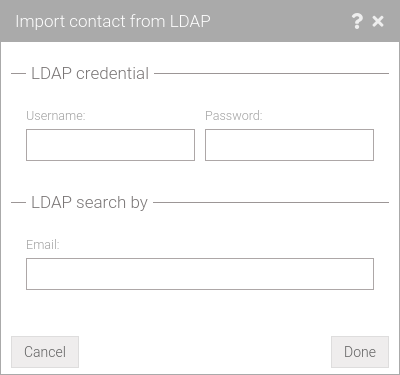
Fig. 43 Finestra di ricerca contatto LDAP
Tip
To generate a random password, click the button (Fig. 42).
Note
Not all contacts require an account, for example, there may be contacts that are only for sending emails, data, etc.
Note
Mandatory or incorrectly filled fields will be marked with red borders. Moving the mouse over the relevant field will give an explanation.
Modify
To modify a contact or account select an entry in the side list and then click the Modify button (Fig. 39). The same add wizard will start, but with the fields already filled in for the selected contact.
When updating user information for the Cantonal Administration (AC), click the Update LDAP Information button. This will open a window (Fig. 44) where the information of the selected contactcan be updated after entering a valid LDAP Username and Password. Clicking the Done button will update the contact form (Fig. 41) if new information has been found or modified.
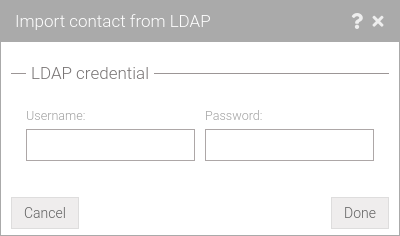
Fig. 44 Finestra di modifica contatto LDAP
Note
When user information is updated via LDAP, the changes are only applied to the contact information. Account information, even if updated, will remain unchanged.
Delete
I’s currently not possible to remove a contact/account with the GUI. In this regard, contact the oasi team via the Send feedback form indicating as the Area of Interest.
Modify authorizations and permissions
As already described in the section Authorizations and Permissions there are different levels of access that for historical and linguistic issues do not exactly coincide with those described. The following table associates the descriptions with the names used in the application:
Authorization |
Permissions |
||
|---|---|---|---|
| description | correspondent | description | correspondent |
Administration |
ADMIN |
||
Spatial data |
SPATIAL_DATA |
||
Temporal data |
OASI |
metadata analysis maintenances and alarms |
network analysis maintenance |
RNI cadastre |
RNI_CADASTRE |
||
RNI cadastre write |
RNI_CADASTRE_WRITE |
||
Viasuisse |
VIASUISSE |
||
Supply |
SUPPLY |
||
These permissions can be changed by clicking on the Authorizations drop-down menu (Fig. 45) in the account add/modify form (Fig. 42).
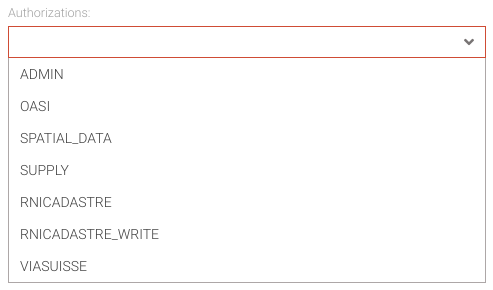
Fig. 45 Authorizations menu
Activating OASI authorization in the add/modify account form (Fig. 42) will display a list where you can manage permissions (Fig. 46).
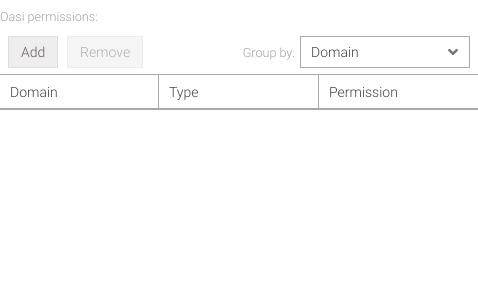
Fig. 46 OASI permissions
Clicking on the Add button will open a window (Fig. 47) that allows you to choose the permissions you want to assign to the user. Once selected, click on the Done button and they will be visulized in the list of permissions (Fig. 46).
To remove a permission, select an item in the list of permissions (Fig. 46) and click the Delete button.
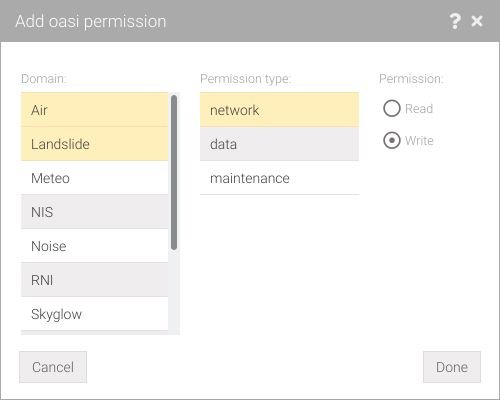
Fig. 47 Add/modify OASI permissions
Tip
Multiple domains and permission types can be selected (Fig. 47) by holding down the ctrl key while selecting an entry.
Organization
From this panel can be have an overview of all organizations in the application (side list Fig. 48). The list of organizations displays the name and symbol to alert if there is a reference contact.
Using the Filter it’s possible to filter the list by organization name, acronym, description or name/surname of the reference contact.
Clicking on an item in the list will give the details of an organization.
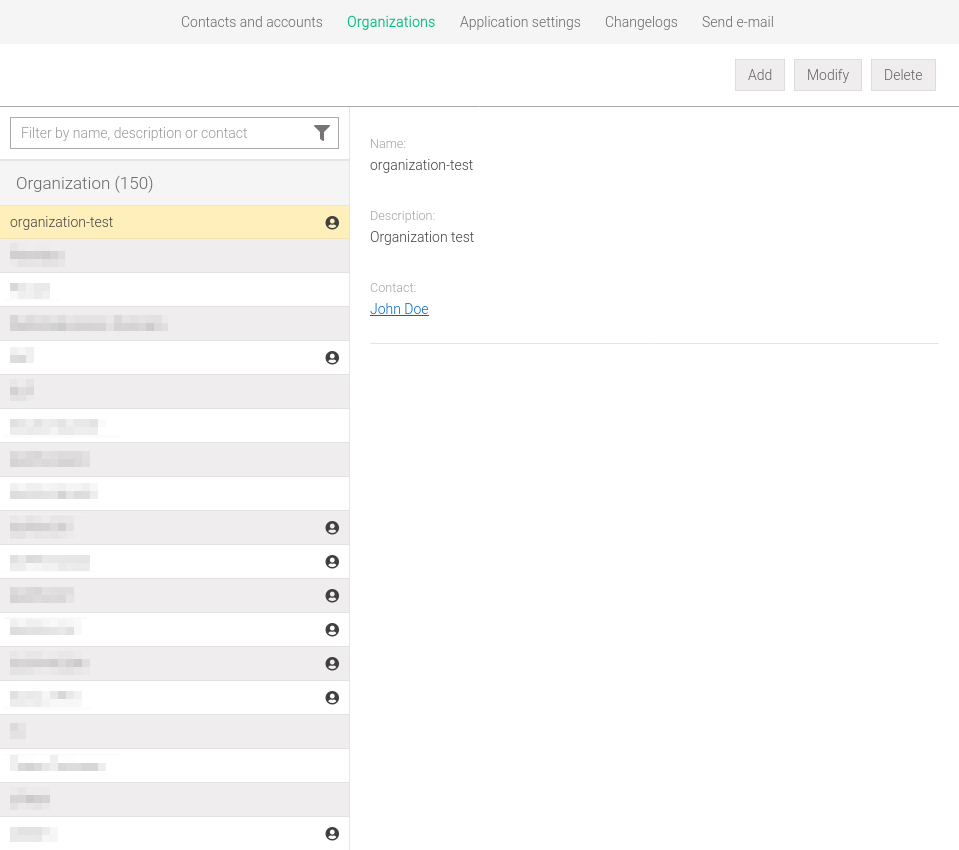
Fig. 48 Organizations administration panel
Add
By clicking the Add button will open a window which allows to create a new organization (Fig. 49). Click on Done button to add the organization.
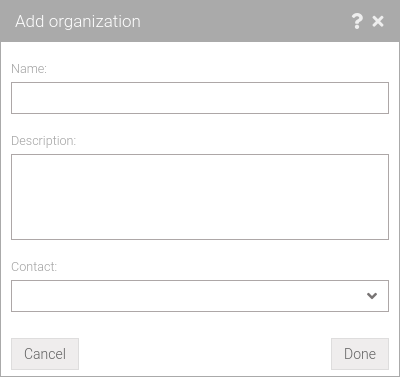
Fig. 49 Window for adding/editing a organizzazione
Note
Mandatory or incorrectly filled fields will be marked with red borders. Moving the mouse over the relevant field will give an explanation.
Modify
To modify select the desired organization from the side list and click on the Modify button (Fig. 48). This will open the same window for adding but with already filled fields for the selected organization. Click Done to apply the changes.
Delete
To remove select the desired organization from the side list and click on the Delete button. Confirmation will be asked if really want to remove the selected organization.
Warning
If the organization is in use by a contact this will not be deleted.
Application settings
To access this panel click on the Application settings tab (Fig. 50). In this panel can be managed both search indexes and maintenance mode.
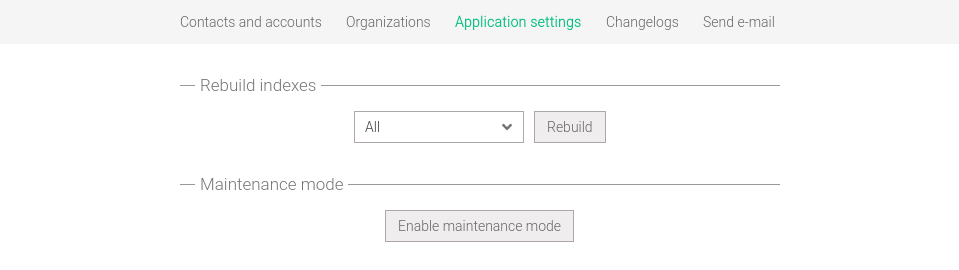
Fig. 50 Administration panel application setting
Indexes
Search indexes are used to speed up the search for some fields and need to be updated when changes are made.
Currently there are two types of indexes that are used and they are:
layer index: indexes the names and descriptions of layers used for searching in Maps
Lot index: indexes the location and number of lots, and these are also used for searching in Maps
To update an index choose from the drop-down menu the type you want to update and click on Rebuild button. When the operation is completed a message will be displayed indicating whether the operation was successful or not.
Maintenance mode
By clicking the Enable maintenance mode button the application enters in the maintenance mode, this ensures that all future requests are redirected to the maintenance message page (Fig. 51).
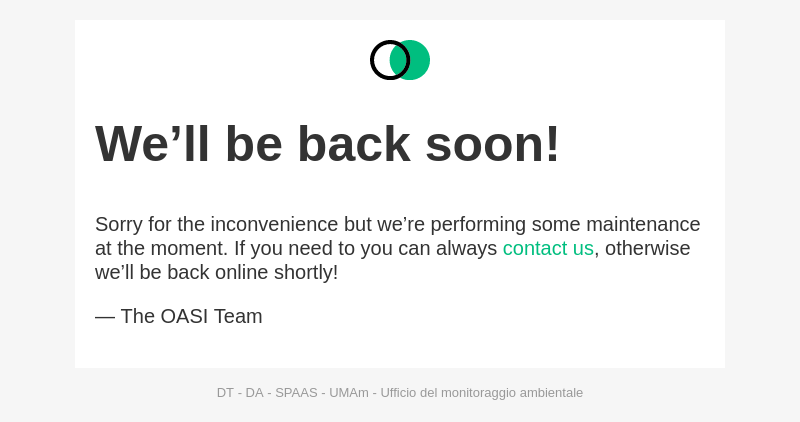
Fig. 51 Message in maintenance mode
To disable this mode, the administrator must have access to the server where the application resides and change the value of the maintenance variable to false in the file:application.properties file.
Changelogs
From this panel you can manage the changelogs that is also displayed in the title bar by clicking the button.
Using the Filter… it’s possible to filter the changelog list based on the words found in the content.
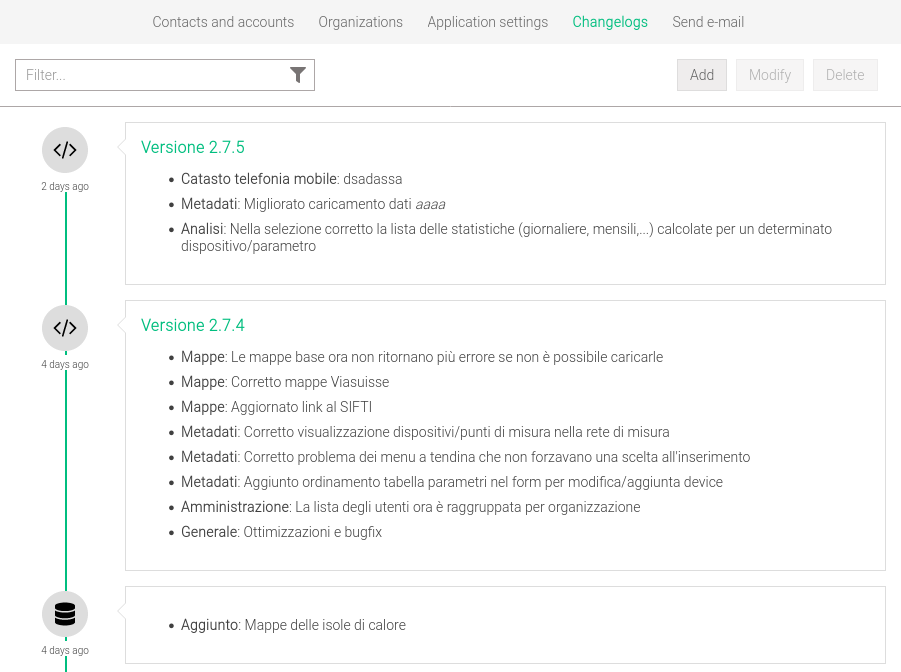
Fig. 52 Changelogs on the administrator panel
Add
To add a new changelog click on the Add button (Fig. 52) where a window will open which allows to create it (Fig. 53). Click Done to add the changelog created.

Fig. 53 Add/Modify changelog form
Note
Mandatory or incorrectly filled fields will be marked with red borders. Moving the mouse over the relevant field will give an explanation.
Modify
To modify select the desired chnagelog from the list (Fig. 52) and click on the Modify button. This will open the same window for adding (Fig. 53) but with already filled fields for the selected changelog. Click Done to apply the changes.
Delete
To remove select the desired changelog from the list (Fig. 52) and click on the Delete button. Confirmation will be asked if really want to remove the selected changelog.
Send e-mail
Administrators have the ability to send e-mails to users. This can be useful, for example, to alert them of some down service.
To access this panel click on the Send Email tab (Fig. 54).

Fig. 54 Administration panel sends email
There is the ability to send e-mail by filtering accounts by:
Authorizations: accounts with a certain authorization,
Last login: accounts that have logged into the application in the last 1, 7, 30, 365 days or all regardless of last login,
Account type: accounts that are part of the Amministrazione Cantonale (AC), locally created accounts, or for all types of accounts.
By clicking on the Show Contacts button, you can view the list of users who will receive the e-mail (Fig. 55).
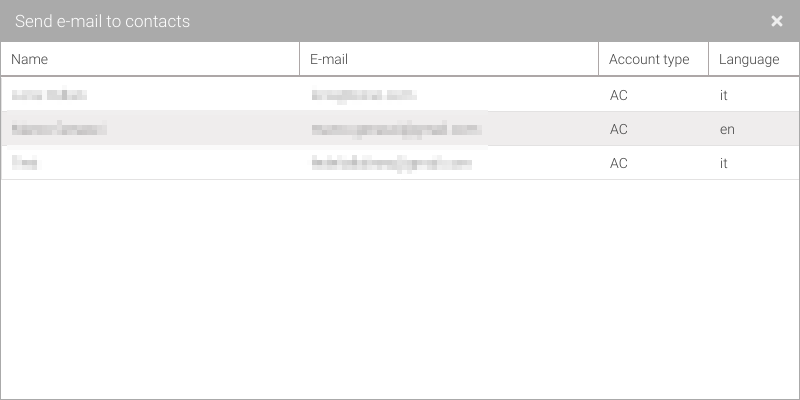
Fig. 55 Users list to send the e-mail
In order to be able to send the e-mail you are required to write the message, Subject and Body, in all languages supported by the application. The Body field allows basic formatting for the text. Once all the fields have been filled in, it’s possible to get a preview of the message to be sent (Fig. 56) by clicking the Preview button or actually sending the e-mail by clicking the Send button. The send operation will display a message indicating whether the action was successful or not.
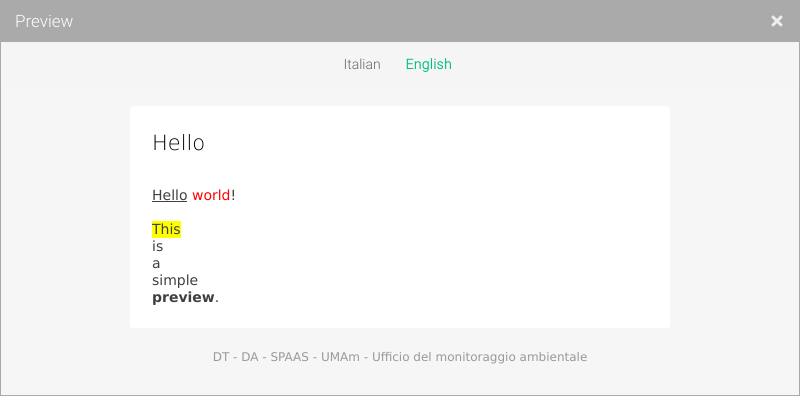
Fig. 56 Email preview
Warning
The message body formatting body sometimes creates problems not visible in the text editor so it is recommended to preview the e-mail before sending it.
Logout
To logout from Palma click on item from the user menu (Fig. 32).